DHCP Snooping Explained: How to Protect Network from Rogue DHCP Attacks?
Introduction to What Is DHCP Snooping?
In today’s digital network, protecting the network infrastructure against attacks is crucial. A malicious user can attack network devices and exploit DHCP to launch spoofing attacks. To prevent such threats, we use DHCP Snooping. DHCP snooping is a Layer 2 security feature that protects the network from spoofing attacks such as those involving rogue DHCP servers assigning invalid IP addresses. It acts as a boundary that distinguishes network ports as trusted and untrusted ports and allows only valid DHCP messages (as part of the DORA process) from trusted ports. It ensures that only authorized DHCP servers will assign IP addresses to the end users.
What is DHCP Spoofing
The word spoofing means “impersonating” or “faking” an identity. In the field of computer networking, DHCP spoofing is a malicious DHCP attack where an attacker sets up a fake (rogue) DHCP server and pretends to be a legitimate one for the end-users in the network. It responds to the DHCP operation, such as DHCPREQUEST messages from the user. As a result, the attacker redirects users and assigns malicious or incorrect settings to the users. To mitigate this type of attack, we use DHCP snooping for shielding against such attacks.
How Rogue DHCP Server Works?
The working of the DHCP server is to assign IP addresses to the end users through the DORA (Discover, Offer, Request, and Request Acknowledge) process. When a user in the network tries to obtain an IP address from the DHCP server, then he/she discovers the DHCP server through DHCP discovery messages by sending layer 2 broadcasts. However, if a rogue DHCP server is present in the same network, then it also sends a DHCPOFFER message, offering an IP address to the user.
- The user responds by requesting for the IP address through a DHCPREQUEST message.
- The rogue DHCP server allocates an IP to the client by issuing a DHCPACK message.
The client has successfully received the IP address but is unaware whether it got it from a trusted or rogue DHCP server.
How Rogue DHCP Servers Get Installed
Installing a rogue DHCP server and then assigning IP addresses to the clients is not as simple as it seems. To assign an IP address to the end-users from the rogue DHCP server, the attacker must engage a legitimate DHCP server in such a way that it is not able to assign IP addresses to the users. One common method is DHCP starvation.
What is DHCP starvation?
DHCP starvation is an attack in which a malicious user floods a DHCP server with fake DHCP discovery messages using spoofed MAC messages, resulting in exhausting the IP address pool. Thus, the DHCP server is not able to assign IPs to the legitimate users during this time. Meanwhile, a malicious user injects a rogue DHCP server for providing IPs to the users, acting as a legitimate server.
How DHCP Snooping Works
DHCP snooping uses the concept of trusted and untrusted ports.
- Trusted ports allow DHCP operation. These ports are connected to the core network devices, such as servers, routers, and switches.
- Untrusted ports are those through which DHCP operation is not allowed. End devices like PCs, printers, and other clients are connected to these untrusted ports.
Once DHCP snooping is configured:
- A binding table is created, in which MAC addresses are associated with trusted and untrusted ports. It is known as the DHCP snooping binding table. It contains information like MAC addresses, IP addresses, VLAN information, etc.
- If a DHCP message is received from an untrusted port, the switch will drop those packets.
- However, if the DHCP message comes from a trusted port, the switch allows those packets, ensuring that users can get their IP addresses only from trusted sources.

How to Configure DHCP Snooping in Packet Tracer
Configuration of DHCP snooping is not so hard, due to which we can easily configure it in Packet Tracer. Below is the lab where we will configure DHCP snooping in it.

First, we configure the first dhcp server (legitimate server) with a static IP address and other network parameters.

Now we configure its pool of IP address;

Verify the IP address on client PC through DHCP.

Now we are going to configure the second DHCP server’s (rogue DHCP server) IP address.

After configuring the rogue DHCP server IP address, configure its IP address pool.

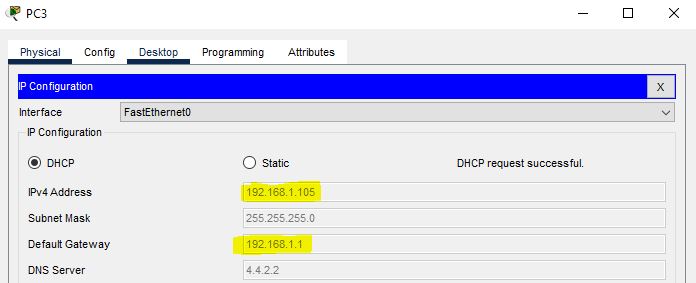
Go to any PC and obtain IP address dynamically. First, select static method, and then again, click on DHCP, and then the PC will get an IP address from the rogue DHCP server. It has the same pool as the first one, but it has a different default gateway.

This time, this PC3 got the IP address from the same range, but it does not know where I got the IP address. Whether it has gotten the IP address from the company server or from another source. To stop this in the network, configure DHCP snooping on the switch.

Also configure the limit rate on untrusted ports. It will not allow switching to receive DHCP packets on specified interfaces, such as untrusted ports. The rate limit helps our DHCP server to shield against DHCP starvation.

Go to PC3 again, and assign an IP address dynamically by changing from static to DHCP and then again to DHCP. This time it will not get an IP address from a rogue server, but it will get an IP address from a legitimate server.
PC3 will not get an IP address from untrusted interfaces. In the same way, all other PCs will do this.
Let’s check the DHCP snooping configuration through the following commands:

Also, run the other binding command.