How to Set Up 802.1X Authentication in Cisco Packet Tracer
In today’s enterprise network environments, the implementation of NAC (Network Access Control) is no longer optional, but it is mandatory. One of the most robust and widely used protocols for port-based network access control is IEEE 802.1X. 802.1X is a framework through which we implement authentication at Layer 2. It acts as a guard that authenticates users who want to connect to a LAN or WLAN network.
802.1X works in the form of client-server architecture, where the user also called the supplicant, acts as a client. The authenticator, such as a switch or a wireless controller, controls access to the network based on the authentication status of the endpoint. Finally, the authentication server, such as a RADIUS server, receives the information from the authenticator and validates the identity information sent originally by the supplicant. The server will respond with a RADIUS either accept or reject message, which is sent back to the authenticator.
802.1X uses Extensible Authentication Protocol (EAP) for communication between the user (supplicant) and the RADIUS server (authentication server).
Lab for 802.1x in Packet Tracer
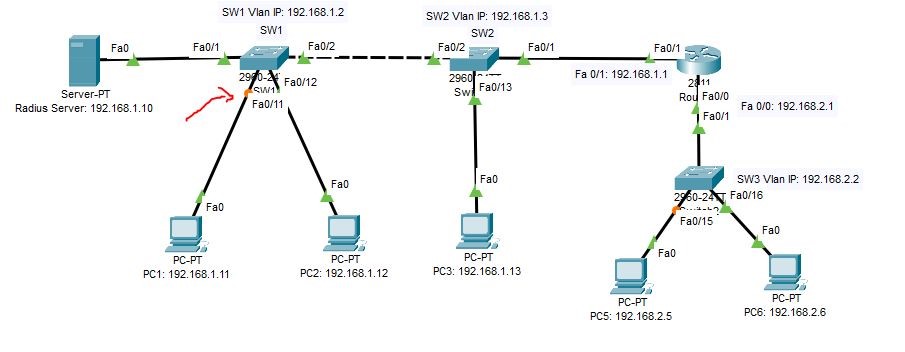
The following lab topology will be used for the Dot1x authentication method.

Connect all the devices as given in the diagram and configure all the IP addresses of the PCs, server, and Switches.
After configuring PCs IPs, configure the server as AAA server and its other configurations as given in the diagram.
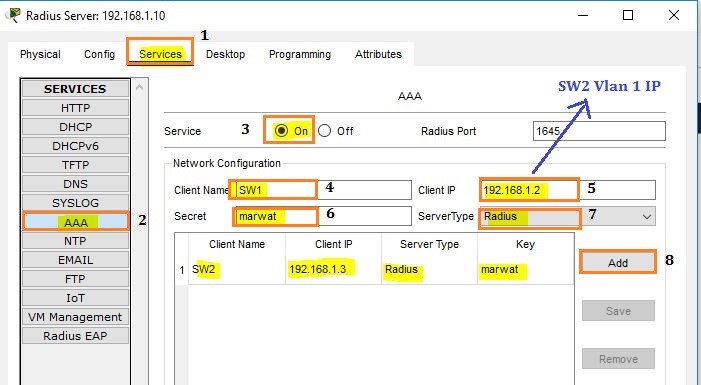
The next step in the RADIUS server is to create usernames and passwords for PCs.
Create 5 usernames and passwords such as PC1 having username pc1 and password pc1.

The next step in the RADIUS server is to enable EAP-MD5 service. For this, go to RADIUS EAP and tick the box for allow EAP-MD5.

Configure the switch with basic settings such as below;

Now configure the DOT1X authentication on all three switches as given below. Here we are configuring switch, and you should configure the other two switches in the same way with their respective interfaces.

Check the interface fast Ethernet 0/1 at switch1. It’s color is orange color which indicates that there is an issue.
The reason is we didn’t active 802.1x on the PC1. How to active 802.1x authentication on PC1. Check it below:

As we activate 802.1X on PC1, check again its interfaces status;

Ping from PC1 to RADIUS server;

In the same way configure all the other PCs in the topology for dot1x authentication.