Getting Started Router Access Through Telnet Python Scripts
When a router is not directly accessible, we mostly use either SSH or telnet to configure a router. In this article, we will explore the use of Python script to establish telnet access to a router. We will be simulating this lab within GNS3 software. I directly connected GNS3 to my laptop (PC). It’s worth noting that I have already published an article on connecting GNS3 to a real network (laptop).
Lab for Telnet Router Access Through Python Scripts
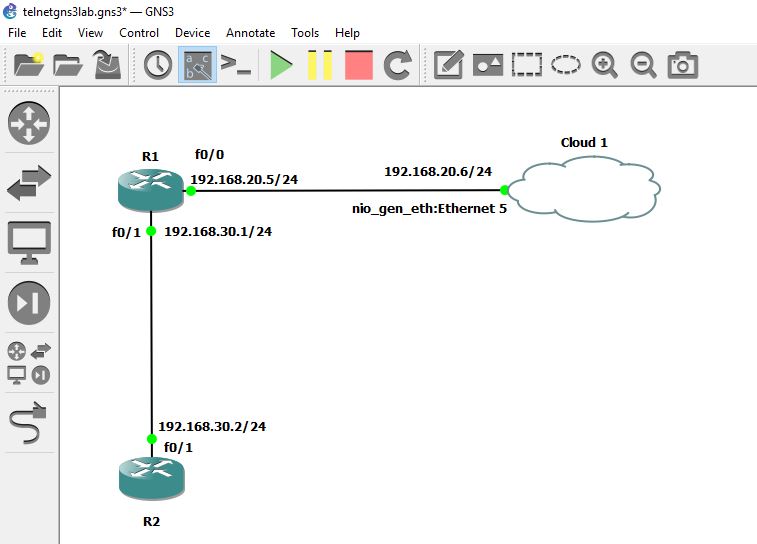
This is our lab scenario in GNS3 for Telnet. We will use a telnet script to configure a router through Telnet. There are two routers in the lab and a cloud that is connected to R1. The cloud represents a PC network adapter. Router R1 is directly connected to the PC through the cloud. The network between Router R1 and cloud is 192.168.20.0/24 while the network between R1 and R2 is 192.168.30.0/24.

We assigned 192.168.20.6/24 to the PC network adapter (ethernet 5). Verity it.

Configure the IP address at R1 on both interfaces (Fa 0/0 and Fa 0/1). Also,, run EIGRP 1 on R1 after IP address configurations.

Similarly, configure the IP address on R2 and also run EIGRP on R2.

The cloud is directly connected to R1, the Cloud will go to R2 via R1. So, configure the R1 fast ethernet 0/0 IP address as the default gateway of the cloud (ethernet 5).

Create a user and its password at R1, and also configure VTY lines on R1.

Also, create a user and its password on R2. Create VTY lines on R2 as well.

First, we are going to check connectivity between the PC and GNS3 router R1. Write ping command followed by an IP address of R1 Fast ethernet 0/0.

Now we are going to write a script in vscode for R1. In the script, we have used a variable HOST1 in which we input the R1 IP address (192.168.20.5). The script will first telnet router R1, and then it will change its name from R1 to Router_R1.

Now run the script through CMD in the PC.

After running the script, first it asks for a username and password and then goes into global configuration mode, which change the router name from R1 to Router_R1.
There is also another router R2. Now we will run the Python script for R2 and configure the R2 name from R2 to Router_R2.

Run the above script on PC via cmd.

We are going to add a Loopback address in the lab. We will create a Loopback interface and assign an IP address to it through Python script.

Run the Python script in PC cmd.

Check the Loopback interface IP on R1 for verification.

We defined the static IP address of the desired PC in the above script, but in the next script, we will not define the IP address, but the user will input it at runtime. The output of the script will show a running configuration.

Run the above script on the PC.

Similarly, we are going to write another script with a little amendment. Just add a ping code to ping first the device and then telnet it.

Now go to PC open cmd, and Run the script. The script will first ping the router, and then it will telnet it.

Run the Script for R2


